The Name List does a lot more than just sending codes to your camera and showing which subject you’re currently photographing. This tutorial will explain all the advanced options you have for editing and sorting your name lists.
Done/to-do checkmarks
After tapping a name for the first time and getting a confirmation from the Entagged, a checkmark will appear in the small circle to the left of that name. This is to keep track of the subjects you’ve already photographed, and which you haven’t. You can also check or uncheck these manually, by tapping on the circle or checkmark icon, rather than the name. So if you accidentally tapped a name you’re not about to photograph, you’ll want to clear the checkmark to make sure the checkmarks really match the progress of your shoot.
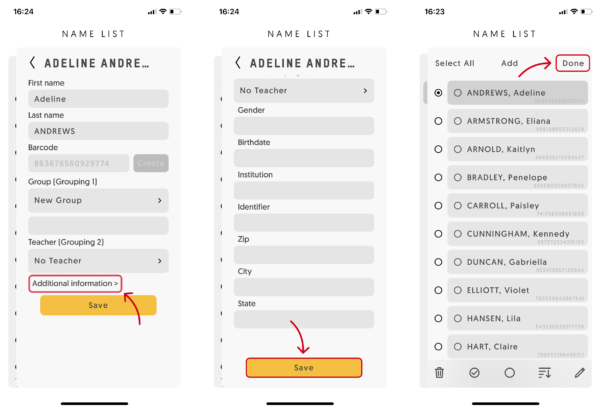
You can also check or uncheck an entire list or group by tapping the pencil icon in the top right, then tapping “Select All” in the top left, and in the toolbar at the bottom, tapping either the empty circle or the checked circle to mark all as to-do or mark all as done, respectively.

Sorting your projects, groupings and name lists
You can sort your name lists by first name, last name, code or the original sorting of your imported list.
In the Name List screen of the Entagged app, whether on “Projects” or a deeper level, tap on the pencil icon in the top right, then tap the sorting icon in the bottom toolbar and select your desired sorting order. This sorting order will automatically be applied to all your projects.

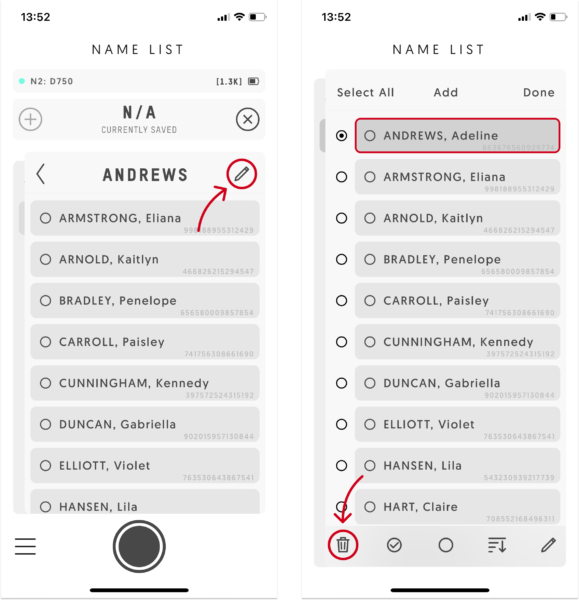
Editing individual subjects
1. Navigate to the group with the subject you want to edit.
2. Tap on the pencil icon in the top right.
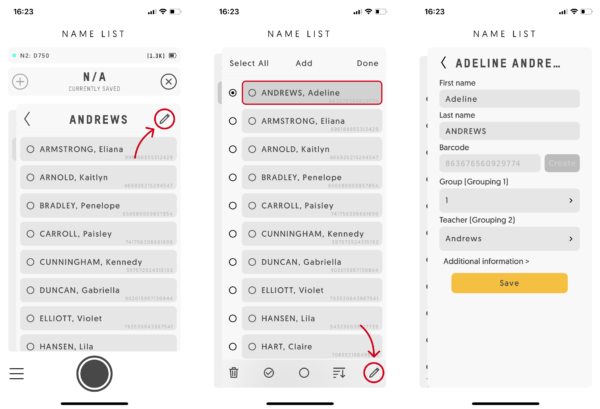
3. Tap your subject’s name to select, then tap the pencil icon in the bottom toolbar on the right to edit.
4. Now you can edit the subject’s first and last name.
5. If you imported a CSV, you can change the code for the subject or generate a new one, but probably shouldn’t, unless you know exactly what you’re doing!
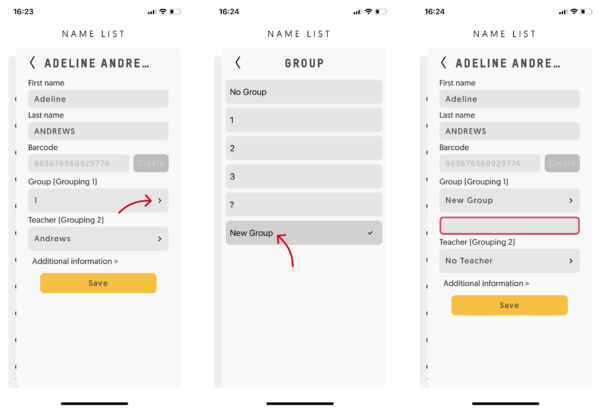
6. If you want to move the subject to a different class/teacher/team grouping, you can simply select a different Grouping 1 and/or Grouping 2. You can even create new ones. E.g. tap “Teacher (Grouping 2)”, then tap “New Teacher” and enter the name of the new teacher in the field that appears below the selection.
7. Tap “Additional information”, right above the “Save” button and you’ll be able to enter more details about your subject. If you imported a CSV, you can enter info for each of your CSV columns. GotPhoto jobs have some options such as Gender, Birthdate, Institution, ID, Address, etc.
8. Tap “Save” and lastly, tap “Done” in the top right corner of the screen.
Some notes:- The name might move within the list, depending on your sorting.
- If you selected a different or new grouping than the one you were in, you will need to navigate to the other grouping to find the subject.
- The selection for Grouping 2 only shows the options already nested in the selected Grouping 1.
Adding a group
You can only create a new group when editing or adding a new subject, i.e. you can’t create an empty group, then start adding subjects. Instead, add a subject and create a new group (see step 6 above).
Adding a subject
You can add subjects in the Entagged app in advance when preparing your lists, or even at the shoot.
1. In your current project/job, or any deeper grouping level, tap on the pencil icon in the top right to start editing your subject list.
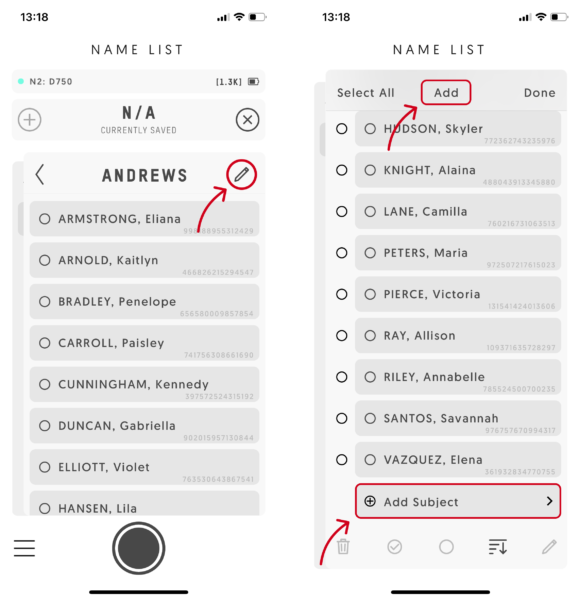
2. Tap “Add” at the top center, or scroll to the bottom of the list and tap “(+) Add item”.
3. Enter the details of your new subject.
- a. First and last name should be self explanatory ;-)
- b. For the code to tag with, you can
- i. manually type in a code, or
- ii. tap “Create” to let the app generate a unique code for you.
- iii. If it’s a GotPhoto job, this field is disabled, as GotPhoto will create a code for you automatically. Note that you need to be online for this to work – more on that later.
4. The current grouping level you were in will be set by default, but you can also select different groupings for the new subject or create new ones. Optionally, tap “Additional information”.
5. Tap “Save”, then “Done” in the top right.
Deleting a subject
You can add subjects in the Entagged app in advance when preparing your lists, or even at the shoot.
1. In the list with the subject you want to delete, tap on the pencil icon in the top right.
2. Now tap your subject’s name, then tap the trash bin icon in the bottom toolbar on the left to delete it.
Working offline at the shoot
For editing, creating new subjects or deleting them, you can be offline.
Using CSV files, everything is local on your app anyway. Changes in GotPhoto jobs will simply sync when you’re online again. There is one exception though: Adding new subjects with GotPhoto synced jobs won’t work offline. But even for this, there’s a workaround: If you know you may need to add a subject on location, either offline or with spotty internet, simply create spare subjects while adding the job to the Entagged app, which you can then edit even while offline.
1. During your GotPhoto Import, select the number of spares you want to add. This will add names such as “Spare 1”, “Spare 2”, etc to the Group “No Group”/”No Teacher”.
2. At the shoot, even when offline, edit a spare to set a new name and additional info and tap save. The code will already be set.
3. When you’re back online, all your edits will be synchronized back to Gotphoto.
Note: If you are logged out of your GotPhoto account, the Entagged Name List behaves the same way as when you’re offline. Any edits will be synced when you’re online and logged in again.