ENTAGGED
Getting Started
Congratulations on your new Entagged.
Foolproof Tagging for Workflow Automation.
Start by getting the app for your iOS or Android smartphone:
Prepare your camera
- On all cameras that support powering the camera via USB, please disable this, or your camera will attempt to charge itself.
- If you previously used the camera’s built-in WiFi, disable it, as it can conflict with the USB connection the Unleashed will use.
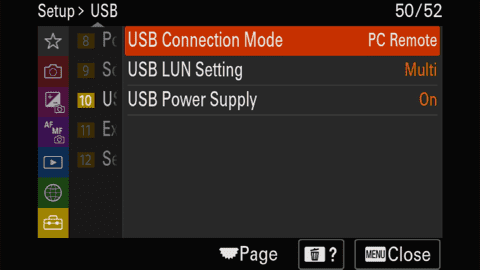
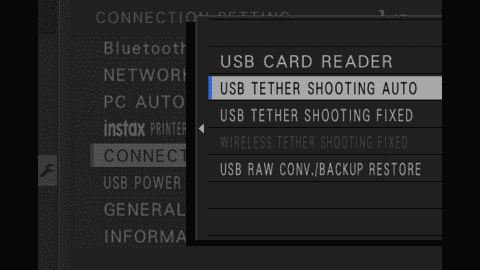
- On Sony, Fujifilm, change your USB settings, and follow additional setup instructions below for the best experience

Sony
The Entagged is only compatible with a handful of newer Sony models, starting with the A7 IV and higher-end cameras released after that. Be sure you use it on one of the compatible models as listed on our Compatibility page.
- MENU > Setup > USB > USB Connection Mode > PC Remote.
This automatically sets:
MENU > Network > Transfer/Remote > PC Remote Function > PC Remote > On and
PC Remote Cnct Method > USB - If previously connected to Image Edge Mobile app via WiFi Direct, disconnect
- If previously set to transfer FTP over USB
Set the camera setting: MENU > Network > Transfer/Remote > FTP Transfer Func. > FTP Function > Off

Fujifilm
- On newer cameras (eg X-T4), set the camera setting: MENU > SET UP > CONNECTION SETTING > CONNECTION MODE > USB TETHER SHOOTING AUTO
- On older cameras (eg X-T2), set the camera setting: MENU > SET UP > CONNECTION SETTING > PC CONNECTION MODE > USB TETHER SHOOTING AUTO
- If previously connected to Fujifilm Cam Remote app via WiFi, disconnect
Plugging it in
The Entagged N1 and N2 are powered through the plug on the Entagged, and can trigger the camera through that port but for code tagging you need to use the USB cable that comes with the Entagged.
The Entagged M is powered through the HDMI cable, and the USB plug on the Entagged is used to control the camera and for code tagging. For all Entagged models, the cable therefore needs to be plugged in at all times for it to work properly.
If the cable is plugged in incorrectly, the Entagged M won’t power up, the Entagged N1 and N2 might trigger or half-press the camera’s shutter continuously and in all cases the Entagged’s LED will be off. There is a slot and key in the plug and Entagged that should prevent you from plugging the cable in the wrong way round, but because the casing is made of plastic, it’s possible to overcome this. We designed the Entagged so that even if you do this, it won’t break anything – it just won’t work.
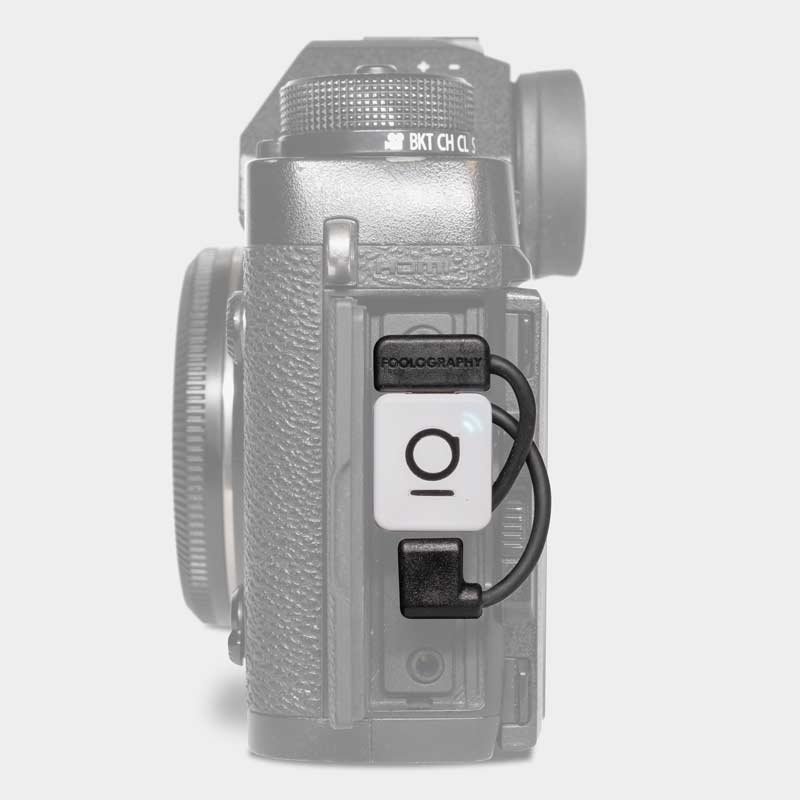
Here’s how to plug it in correctly: Looking at the front of the Entagged with the logo toward you, the socket will be at the top. Plug the cable into the Entagged so that the cable points
- toward the right for the Entagged M and N1.
- toward the left for the Entagged N2.
We made the cable as short as possible but for an even neater fit, it can be wrapped around the Entagged as pictured below.

Entagged M on Sony A7R V

Entagged M on Fujifilm XT-2

Entagged N2 on Nikon Z 7II


Micro USB 3.0
Some cameras have the wider Micro-USB 3.0 ports, but what many don’t know is that the socket is backward compatible and normal Micro-USB 2.0 plugs fit into one half of the socket. On all cameras that we know, it is the bottom half.
Streamline your Workflow – Get Name List for Entagged
Save valuable time before, during and after your shoot with the Entagged Name List. Automate your volume photography workflow and eliminate all its pain points. Tag your photos in the easiest and most convenient way imaginable.
Monthly Subscription
25€ per month – cancel anytime
Annual Subscription, billed monthly
10€ per month
Annual Subscription
8€ per month
SUPPORT
- Check out our support page and video tutorials here if you need help getting started.
- We also have lots of FAQs here. Just type a keyword into the search field at the top or scroll through the different sections.
- If you’re having any kind of issue with your Entagged, please read the error messages in the app carefully and follow their instructions to alleviate the problem before reaching out. Often the solution to your problem will already be explained in the app (e.g. you need plug in the cable, insert an SD card, etc.)
- Update your app and firmware to the latest version – we’re constantly publishing updates with bug fixes and improvements. We recommend staying up to date, but if you’re not experiencing any problems, don’t perform any big updates right before an important shoot!
- If you do have an issue, please use our support form, where we’ll request all the necessary information to best be able to support you. Some of the questions might even solve your issue as you answer them. Please include app & firmware version numbers, screenshots and as many details as you can, so we can try to reproduce your issues, and fix them as soon as possible. Thank you!