Posted on Schreib einen Kommentar

Zeitraffer mit dem Unleashed

Niagara Fälle bei Sonnenuntergang

Eines der besten Features des Unleashed ist das Zeitraffer-Feature. Vorab möchten wir das Wort Zeitraffer in ein paar Sätzen zu definieren:

“Ein Zeitraffer ist eine Sequenz von Fotos, die über einen gewissen Zeitraum aufgenommen wurden. Die Fotos werden meist in einer bestimmten Frequenz mit einer festgelegten Intervallzeit zwischen den einzelnen Fotos aufgenommen. Im Endergebnis wird die Fotosequenz mit einer normalen Bildfrequenz gezeigt (24-30 fps: Bilder pro Sekunde), so dass die Zeit schneller als üblich zu vergehen scheint – daher das Wort Zeitraffer.”


Man kann natürlich auch etwas filmen und dann die Szene im Nachhinein beschleunigen, um einen ähnlichen Effekt zu erzielen. Wenn man einen Zeitraffer mit Intervallaufnahmen macht, hat man jedoch die Freiheit, die endgültige Bildfrequenz zu bestimmen. Zusätzlich ist jedes Bild ein hochaufgelöstes Foto, so dass man sogar 8-k-Zeitraffer-Videos machen kann. Und wahrscheinlich einer der größten Vorteile – man muss kein mehrstündiges Video aufnehmen.

Um eine Zeitrafferaufnahme zu machen, kann man entweder alle paar Sekunden von Hand ein Foto machen (was wir nicht empfehlen ;) ) oder ein Intervallometer verwenden. Ein Intervallometer ist im Grunde ein programmierbarer Kameraauslöser, der die Fotos für dich schießt. Es gibt hiervon verschiedene Varianten, die von unter 100 EUR bis zu einigen Hundert Euro reichen. Letztendlich hängt es davon ab, was du erzielen möchtest.

Mit dem Intervallometer kann man einstellen, in welchem Intervall (nach wie vielen Sekunden das nächste Foto geschossen wird) und wie lange man fotografieren möchte. Als Beispiel:

Du möchtest einen Zeitraffer von Wolken machen, die an einem Berggipfel vorbeiziehen. Also stellst du deine Kamera mit dem Intervallometer auf ein Stativ und machst während der nächsten 3 Stunden alle 10 Sekunden ein Foto. Am Ende hast du etwa 1080 Fotos. Kombiniert in einem Video mit einer Bildfrequenz von 30 Bildern pro Sekunde hast du eine Videoclip-Länge von 36 Sekunden (1080/30 = 36). Wie du siehst, ist ein wenig Mathematik gefragt, wenn du eine bestimmte Vorstellung davon hast, wie lang der Clip am Ende sein soll.

Wie macht man Zeitraffer mit dem Unleashed?

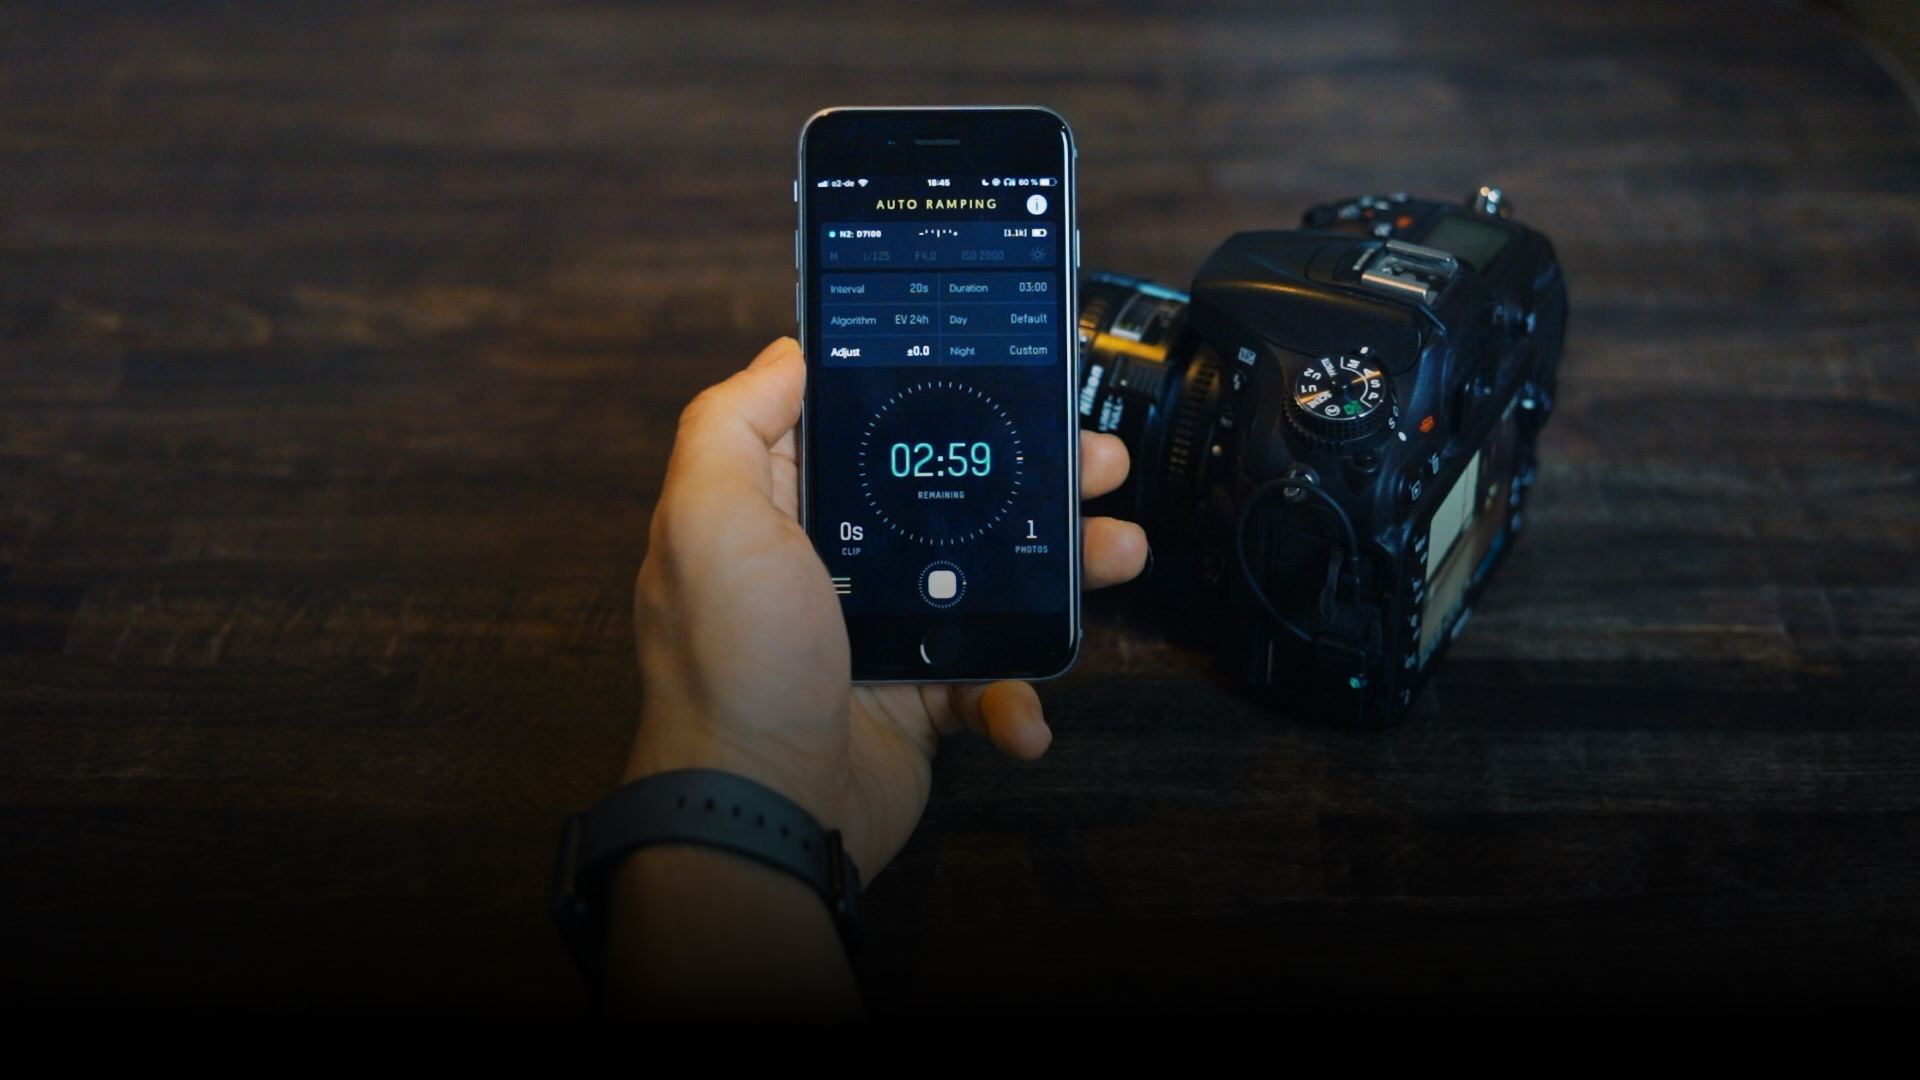
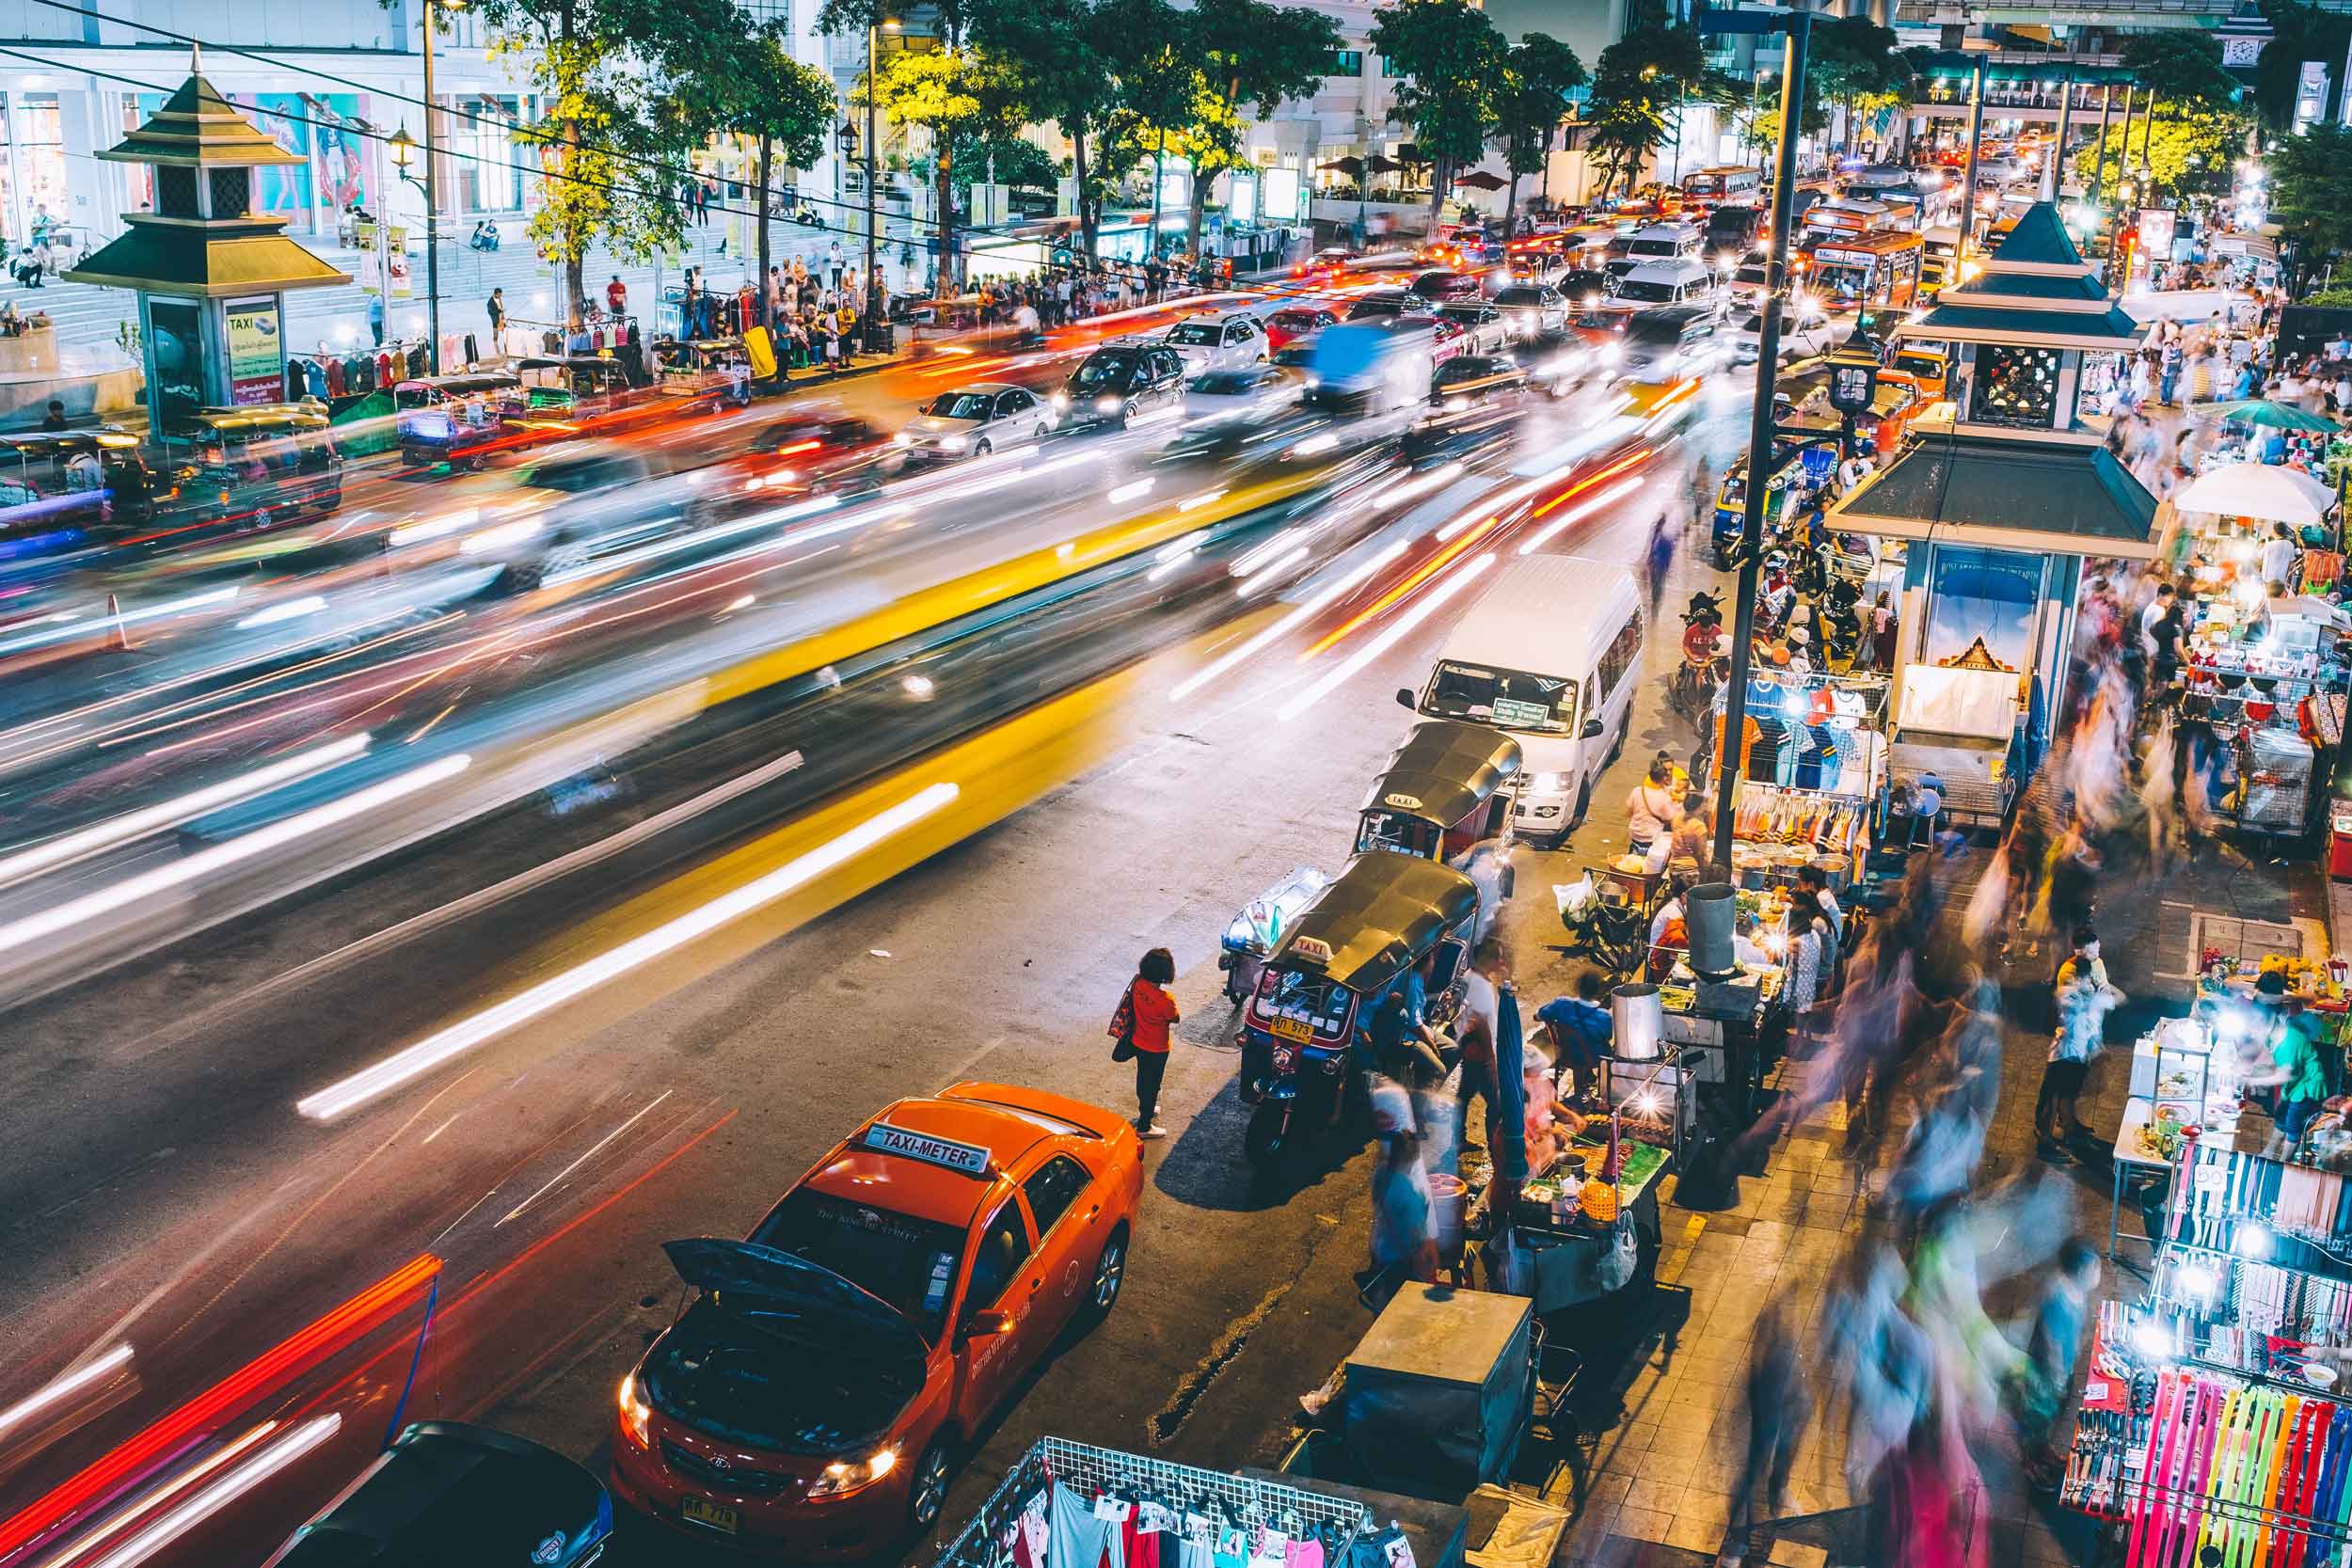
Wir sind der Meinung, dass Zeitraffer atemberaubende Aufnahmen ergeben und deine Videos sehr aufwerten können. Deshalb sind wir besonders stolz auf die wohl konzipierte Zeitraffer-Funktion des Unleasheds. Neben der automatischen Anzeige der voraussichtlichen Cliplänge und der Anzahl der Fotos, die aufgenommen werden (besonders nützlich, um zu sehen, ob deine SD-Karte noch genug Platz hat), bietet dir die Unleashed-App auch die Möglichkeit, Zeitraffer mit Auto-Ramping zu machen, um Tag-zu-Nacht- oder Nacht-zu-Tag-Übergänge festzuhalten, bei denen sich die Kameraeinstellungen im Laufe der Zeit ändern. Das bedeutet, dass du die Belichtung nicht manuell anpassen musst, um sie an die sich ändernden Lichtverhältnisse anzupassen. Schau dir dazu unser Support-Video über die Holy Grail Zeitrafferfunktion an.

Wenn du mit einem einfachen Zeitraffer beginnen möchtest, kannst du auch unsere FAQ und unser Video zu dieser Funktion ansehen. Dennoch möchten wir auch hier einen kurzen Überblick geben.

How-to

  1. Wenn du die App öffnest, befindet sie sich im Fotomodus. Klicke auf die 3 gelben Linien in der linken unteren Ecke, um zum Menü zu gelangen und wähle Timelapse.
  2. Der obere Bereich des Bildschirms zeigt eine Zusammenfassung der aktuellen Einstellungen der Kamera. Du kannst diese Einstellungen ändern, indem du auf diesen Bereich tippst, um die detaillierten Kameraeinstellungen zu sehen.
  3. Im mittleren Bereich kannst du das Intervall einstellen, d.h. in welcher Frequeenz ein Foto aufgenommen werden soll, und die Dauer, d.h. wie lange die Kamera fotografieren soll.
  4. Darunter berechnet die App, wie viele Fotos aufgenommen werden sollen und wie lang die resultierende Cliplänge bei 30 Bildern pro Sekunde sein wird.
  5. In der oberen rechten Ecke des Bildschirms zeigt die App Tipps, Warnungen und Fehler an. Man kann zwar einen Zeitraffer mit Tipps und Warnungen starten, bei Fehlern wird jedoch der Auslöser ausgegraut. Zum Beispiel warnt dich die App, wenn deine SD-Karte nicht genügend Platz für alle Fotos hat, die während des Zeitraffers aufgenommen werden sollen.
  6. Tippe zum Starten einfach auf den Auslöser in der unteren Mitte. Nach dem Start muss das Smartphone nicht verbunden oder in Reichweite bleiben, damit das Unleashed die Zeitrafferaufnahme beenden kann.

Sobald alle Fotos aufgenommen sind, kannst du sie entweder direkt in eine Videobearbeitungssoftware importieren, um das Video zu erstellen, sie schnell in Lightroom bearbeiten oder das Beste aus dem Zeitraffer herausholen, indem du eine Software wie LRTimelapse verwendest, um die Bildübergänge perfekt zu glätten.

Teile gerne diesen Blog-Post oder kommentiere ihn unten, wenn du ihn hilfreich gefunden hast. Bald werden wir mit Hilfe eines unserer Brand Ambassadors professionellere Erkenntnisse über Zeitraffer geben.

Posted on 1 Kommentar

5 Ideen um deine Kamera kreativ zu Hause zu nutzen

Für Fotografen kann es sich sehr einschränkend anfühlen, zu Hause festzusitzen – aber das sollte nicht bedeuten, dass man überhaupt nicht mehr fotografieren kann! Wenn du normalerweise Veranstaltungen fotografierst oder in deinen Möglichkeiten für Naturfotografie begrenzt bist, probiere zu Hause doch einmal etwas Neues aus. Nutze die Ausrüstung, die du hast, und verwende sie für einen anderen Zweck als gewöhnlich. Probiere Food- oder Produktfotografie aus, mache Haustierporträts oder dokumentiere ein neues Hobby, das du vielleicht gerade erlernst. In diesem Artikel möchten wir dir ein paar Inspirationen geben, damit du auch zu Hause beschäftigt und kreativ bleiben kannst!

1. Kombiniere ein neues Hobby mit Fotografie

Es scheint, als ob in letzter Zeit jeder mit einem neuen Hobby anfängt, um die zu Hause verbrachte Zeit spannender zu gestalten. Da viele von uns nicht mehr ins Büro pendeln, gibt es ein paar Stunden mehr pro Woche, die dem Erlernen neuer Fähigkeiten gewidmet werden können: sei es eine neue Sportart, ein Handwerk wie Nähen, Holzarbeiten oder Gartenarbeit, das (Wieder-)Erlernen eines Instruments oder Kunst. Wenn du das Gefühl hast, nichts fotografieren zu können, weil du nirgendwo hingehen kannst, versuche doch deine Entwicklung zu dokumentieren. Das gibt dir nicht nur neue Motive zum Fotografieren, es ist auch sehr befriedigend, deine Fortschritte auf diese Weise zu visualisieren. Hier einige Beispiele:

  • Kochen oder Backen zu lernen, schafft tolle Möglichkeiten für Food-Fotografie – weit über das gelegentliche Handyfoto im Restaurant hinaus! Versuche den gesamten Prozess von der Zubereitung bis zum Endergebnis festzuhalten.
  • Etwas mit den Händen zu erschaffen kann so schön sein… und die Fotomöglichkeiten, die ein neues Handwerk oder eine Form der Kunst bieten können, sind unbegrenzt! Du könntest dich sogar in Produktfotografie versuchen, wenn du deine Kreationen verkaufen möchtest.
  • Mache jede Woche Fotos, um deine Fortschritte in jeglicher Form von Sportübungen, die du übst, festzuhalten. Das funktioniert besonders gut für z.B. Flexibilitätstraining oder das üben einer neuen Yoga-Pose.

2. Lerne aus Beschränkungen

Da die meisten von uns zu Hause festsitzen, nicht in der Lage sind an fotogene Orte zu reisen oder Fotos von Models oder anderen Menschen zu machen, ist es leicht sich so zu fühlen, als hätte man nichts zu fotografieren. Normalerweise hat man eine atemberaubende Landschaft oder ein Model als interessantes Motiv. Es wird sicherlich schwieriger sein, dein eigenes Zuhause interessant darzustellen, aber wenn du deine Wahrnehmungsfähigkeit schärfst, kann das deine zukünftigen Shootings wesentlich erleichtern.

Für die Challenge: Wähle ein Zimmer, in dem du alle Fotos schießen wirst. Schau dich genau um, um mögliche Motive zu identifizieren. Versuche dann, so viele kreative Bilder wie möglich von der Umgebung zu machen, indem du mit verschiedenen Perspektiven, Beleuchtung, negativem Raum und Komposition arbeitest. Du kannst das auch über den Tag verteilen und beobachten, wie die natürlichen Lichtverhältnisse die Atmosphäre deiner Bilder verändern. Sich auf diese Weise einzuschränken, kann deine kreativen Grenzen wirklich erweitern, da du mit dem arbeiten musst, was du hast, und deinen Blick für interessante Kompositionen schärfen musst.

3. (Selbst-) Porträts zu Hause fotografieren

Für viele Menschen bedeutet mehr Zeit zu Hause mehr Zeit mit der Familie. Warum nicht die Gelegenheit nutzen, um ein paar Familienportraits zu machen? Du kannst auch versuchen, neue Techniken an deinen Familienmitgliedern, Partnern, Haustieren, Mitbewohnern oder – wenn du allein lebst – an dir selbst zu üben. Youtuber Sorelle Amore erklärt sehr gut, wie man die besten „advanced selfies“ macht. Ihre tiny room challenge oder dieses Fotoshooting in einer Kleinstadt sind tolle Inspirationen. Selbstporträts zu schießen ist nicht leicht – eine Kamerafersteuerungist dafür äußerst hilfreich. Hier sind ein paar Möglichkeiten, wie du deinen Fotos Kreativität verleihen kannst:

  • Nutze Requisiten wie Brillen, (Handy-) Bildschirme, Prismen, Glaskugeln, Küchenutensilien wie Siebe, Messer usw. vor deinem Objektiv, um interessante Flares und Schatten zu erzeugen
  • Stoffe, die du zu Hause hast, wie Vorhänge, Laken, Schals oder Decken eignen sich super als Hintergrund, im Vordergrund, können um dich herum drapiert oder sogar als Kleidung verwendet werden
  • Projiziere ein Bild oder Muster mit Hilfe eines Overhead-Projektors über das Subjekt

4. Zeitraffer & Langzeitbelichtungen zu Hause

Klar, du hast im Moment natürlich weniger Möglichkeiten zu reisen. Das sollte dich aber nicht unbedingt davon abhalten, Zeitraffer und Langzeitbelichtungen aufzunehmen. Vielleicht kannst du immer noch atemberaubende Sonnenuntergänge oder -Aufgänge von deinem Fenster oder Garten aus einfangen. Wenn du in einem Hochhaus oder mitten in der Stadt lebst, eignen sich die Neonlichter und vorbeifahrenden Autos perfekt für Langzeitbelichtungen. Oder mach was komplett anderes und nimm drinnen Zeitraffer auf: Meal Prep, Essen im Ofen, eine befriedigende Aufräumaktion, deine Pflanzen beim wachsen, jemanden, der malt/zeichnet/baut… die Möglichkeiten sind endlos!

5. Das Airbnb-Fotoshooting

Die zusätzliche Zeit für eine Grundreinigung zu nutzen, scheint im Moment voll im Trend zu liegen. Warum also nicht die Gelegenheit nutzen, um ein kleines Fotoshooting zu machen und deinen Wohnraum in Szene zu setzen? Stell dir vor, du möchtest deine Wohnung auf Airbnb einstellen oder in einem Innenarchitektur-Magazin gefeatured werden – deine Wohnung sollte makellos sein. (Vielleicht kann es dich auch motivieren, in Zukunft aufzuräumen, wenn es nicht mehr wie auf den Bildern aussieht ;) ) Werde kreativ mit deinen Aufnahmen − verwende Weitwinkelobjektive für weitläufige Aufnahmen des Raums und engeren Objektiven für Detailaufnahmen. Ein Makroobjektiv ist perfekt für Details, die normalerweise übersehen werden und um coole abstrakte Aufnahmen von Haushaltsgegenständen zu machen. Wenn nicht viel natürliches Licht in deine Wohnung kommt, kann dies auch eine gute Herausforderung sein, um deine Fähigkeiten im Fotografieren bei schwierigen Lichtverhältnissen zu üben.

Wir hoffen, dass etwas dabei war, was dich dazu inspirieren wird zu Hause kreativ zu werden!

Posted on Schreib einen Kommentar

How to? – Unleashed Tutorials

Unleashed Video Tutorial

When you order the Unleashed, it comes in a beautifully designed box. In order to get started, all you need to do is to install the free Foolography Unleashed app, plug the Unleashed into your camera and start the app to connect. We designed and developed everything with the goal that you won’t need a manual. However, we did get some feedback that a couple of explanations would be helpful. That’s why we shot several How-To-Videos that you can find on our support page. So if you’re still wondering how some of the modes work, check out the videos that explain all features in detail. The tutorials come with English and German subtitles as well as text transcripts so you can get the most out of your Unleashed.

UNLEASHED TUTORIAL VIDEOS

If you have any feedback, please let us know. You can either have a look at our forum or write us an email to our info@ address. Thanks for your on-going support!


Posted on 2 Kommentare

How to? – Long Exposure

How-to-do-long-exposure 

As we’re reviving our blog, we thought it would be great to introduce a series that is about photography and film making itself. Terminology, basics, techniques and hacks. At some point we hope to get other photographers to share their best practices or their newest “how-to”. Let’s see where this takes us. Our final goal is to see people flourish in what they love doing – so we want to help in the best ways we can. And since we’re kind of into this photography thing, we want to engage with other photographers and filmmakers all over the world. So if you love your camera or are just getting started: This is the right place for you. :-)

We know, in general, there are many ways to reach a certain goal. It’s the same when taking photos or videos. That’s why, whenever we or someone else posts something, we want to start a conversation and discuss ideas.

Today, we want start off the series by looking into some of the basics behind long exposures.

LONG EXPOSURE PHOTOGRAPHY

A small excursion into the making of a photo: A photo needs exposure to be able to show what you photographed. Exposure is the amount of light hitting the electronic image sensor – or in earlier days – the photographic film. It determines how bright or dark a picture is in the end. This is variable, so the “perfect” exposure length varies from photo to photo. It all depends on the effect you want to achieve. In the end there is no „correct“ exposure length for a given subject – in the end it is very much subjective.

In photography, the exposure is determined by the shutter speed, aperture (the opening of the lens) and ISO (which basically controls the brightness and darkness of your photo). It’s a formula of three variables. For long exposures, you still consider all three variables. But here, shutter speed is the significant factor: It is the only variable that actually has a connection to time. That’s why it’s called “LONG” exposure. So the idea behind the long shutter speed is, that, because of the time factor, you’re able to catch (more) movement – things that happen over a period of time. And in the end, movement is what makes for a typical long exposure shot.

Typical scenarios where long exposures are used:

Night Photography

Night photography deserves an own article since the topic is huge. There are many ways to take photos at night, but one thing is certain: To avoid a super dark photo and a lot of noise (due to high ISO), you have to use a slow shutter speed. Even with a very low aperature (lower than f2), at some point the lens cannot be more open to catch more light.

  Night Photography

Star Trails

Even though it’s part of night photography, catching star trails is a category of its own. It involves special techniques (bulb mode, stacking etc.) and a lot of preparation and timing. The idea behind it is to catch the stars’ movement, caused by the earth’s rotation, which creates fascinating light trails.

Light Painting

Here, you keep the scene very dark and use a light source (flashlight, fire, smartphone LED) to “paint” something in the air. As the shutter stays open and the (bright) light source is moving, you get crystal clear lines of light. You can even write entire sentences this way.

  Light Painting

Water-Long-Exposures

Long exposures of moving water create a very mystic/misty look. It’s quite often used in combination with the HDR technique. The objects framing the water stay sharp – this creates tons of interesting composition options.

City-Long-Exposure

It’s the same principle as for water-long-exposures. This time, the stationary elements of the photo are the buildings and the moving elements are the cars. With their lights they create those beautiful light trails tracing the city streets.

Car Light Trails  

So the next time you want to go out there to take photos, consider trying night photography. It brings tons of opportunities for creative long exposures and other beautiful photos. Take your tripod, set your camera to manual mode, try to use a low ISO and aperture – and play around with shutter speed. One last important tip: Try to use a camera remote control so you don’t have to touch your camera. Pressing the shutter can cause some shaking and the photo will be blurry. Our Unleashed is a great option for this and can make your next long exposure adventure a lot easier and more enjoyable!

Let us know in the comments what long exposures you like doing the most or what special tips you have for certain scenarios and effects.

Make sure you follow us on Facebook, Twitter and Instagram to get exciting news on Foolography, photography, videography and other interesting topics. Scroll down to subscribe to our quarterly newsletter to stay up-to-date and become part of the Fools. ;-)

Posted on Schreib einen Kommentar

Unleashed Journey Pt. 1: Crowdfunding – Why and How?

Crowdfunding: How to run a successful campaign

30th of September 2016: Against all odds, the Foolography office in Berlin Mitte is filled with over 50 people. Not employees, but friends and family who want to celebrate the successful funding of the new Unleashed on Kickstarter. 186,723 €, more than 300% of the initial funding goal. All achieved by a couple of people committed to a dream and passion. Honestly, we could have never imagined of the amount of support we got – from the people around us, and especially from the Kickstarter backers and supporters who also believed in what we were trying to achieve.

11th of April 2018: Looking back today, we’re still amazed by the journey we are on and the development of Foolography and its employees. Being finally able to ship the Unleashed in a couple of weeks, we decided to give people the opportunity to be part of that journey: The journey of the Unleashed.

In this three part series we want talk about crowdfunding, what it’s like to be and run a hardware startup and where we see Foolography in a couple of years. The goal is to give you valuable insights, tips, dos and don’ts and hopefully encouragement to chase your dreams and hang in there – whether you have or want to start a business, are a photographer yourself or just interested in what we do and wondering how we do it.


WHY

Why crowdfunding?

This is the question we asked ourselves two years ago when we decided to launch a Kickstarter campaign for the new Unleashed – a smartphone DSLR remote control. And to be honest: We’re still asking us this question today from time to time. Clearly, crowdfunding is one of the best things that ever happened to help you to turn ideas into reality. Kickstarter puts it this way: “Our mission is to help bring creative projects to life.” However, what many people don’t know or at least underestimate: Doing a crowdfunding campaign is a lot of work – before and after it. Especially after it.

Maybe you didn’t know, but there is a Berlin hardware startup community. And many of those startups actually started off with a successful crowdfunding campaign. This is great and was especially helpful to us when we were playing with the idea of doing a Kickstarter campaign ourselves. We met with people who were further along the journey and absorbed all infos and insights we could get. Even though Foolography has been around for a couple of years at this point, doing a crowdfunding campaign was definitely a step into the unknown.

After a couple of weeks we had our “whys” and essential reasons why crowdfunding could be helpful and, what is even more important, why it might be the right next step for us. This is why we launched the new Unleashed on Kickstarter:

1. Money for production.

Marc Andreessen, a pretty famous investor, once said: “Hardware is hard”. Well, we couldn’t agree more. Building a technology hardware company is by far much harder than building a software company. There are many reasons why that is and one of the biggest is: In order to deliver the product to your customer, you need to produce it first. Meaning, physically produce it. Including finding the right parts, producing the PCB, the casing, the packaging, taking care of the assembly and much more. All things you don’t really have to worry about when having a digital product. And those things mentioned are usually pretty expensive and most important: You have to pay for it in advance before you are actually able to sell your product. So crowdfunding definitely is a big help when it comes to production of your product.

2. Proof of concept.

Whenever you have an idea for a new product it is wise to find out if there is a market for it. What do other people say about it? Are people already signing (or lining) up to get your product? And with people I don’t mean your grandparents or close friends. I’m talking about people who don’t know you but who could potentially be your future customers. Do you have a proof of concept? The cool thing about a good proof of concept is that it not only helps you to understand whether there are people out there who want to have your product, but to understand whether people like the way and method how you present and sell your product. See, the proof of concept is not a single yes or no. It’s a commitment to pay for what you offer. And usually that happens – yes, because of the greatness of your idea – but also because of how you marketed and sold it. So a proper proof of concept not only confirms your idea but also helps you to find a the right go-to-market strategy. Crowdfunding definitely is a good tool for that since people are supporting you not only with words but with money.

3. Building a community.

Having a community (or even customers) when you start shipping your product is one of the best things you can have. It literally is a kick-start. You will have people talking about it, testing it and in best case recommending it. And in the end, this is something worth more than thousands of online ads: People that recommend and advertise your product to their friends and family, in their own personal and unique way.


HOW

How to do crowdfunding?

You can find thousand of infos, you can read hundreds of articles and you can talk to dozens of people on how to approach this whole crowdfunding thing. And to be honest, I believe all of that is good and necessary. Because as it is with most things in life: Preparation is the key. So you actually can prepare a crowdfunding campaign and you actually can increase your chances of getting funded. We did all of the things listed above and they definitely helped us. But nonetheless, people still keep asking: “What are the biggest tips you can give me, when I want to do a crowdfunding campaign?” So here are the top ten of, I believe, most important things to consider and prepare well when doing a crowdfunding campaign.

1. Have a working prototype.

Oh yes. Something that is super important (probably the most important) and non-negotiable. Before you go public on a crowdfunding platform, have a working prototype of your product ready. (This is something we will discuss more in detail in part two of this series.)

2. Talk to people who (successfully) did it before.

I mentioned this before and cannot emphasize it enough. Reach out to people who did a crowdfunding campaign before and get as many insights as possible. Come prepared and ask questions.

3. Have a strategy, including a Plan B and C.

This seems to be an obvious thing to do, but it is those simple things that you forget or don’t do properly. Take enough time to write down your vision, goals and strategy. Try to sharpen your product’s USPs, verbalize them and get feedback.

4. Have a CI. Or at least PI (Product Identity).

It should be clear who you want to reach out to and what people perceive when getting in contact with your business or product. This includes a logo, slogan and everything you learn in Marketing 101.

5. Have a website or landing page outside of Kickstarter or Indiegogo.

You could argue about that point, but I personally think it’s necessary in order to be able to provide further information, have an official point of contact and most importantly to build trust.

6. Have a (large) newsletter list before.

This is something that can determine whether your campaign is successful or not. Having people that are ready to support you at the very start will push you forward in many ways. One way could be that the faster you get a lot of support, the more you become interesting for press or the crowdfunding platform itself. And this in return will generate awareness of your campaign.

7. Have a good video.

When looking for tips on the internet this is one of the things you will find the most. And yes, it’s very important. But what makes a good video is such an enormous topic for itself. Write us if you want further infos. ;-) Maybe we do an own article just about that – let us know in the comments if this is something you’re interested in.

8. Spend time on an appealing crowdfunding page.

The page of your campaign probably is the first or second point of contact for your potential customers. Make sure it’s visual, appealing and nicely structured. For example, remember to not overload it since most people will only have a look at the first few paragraphs and just a few will scroll down to the bottom.

9. Have a PR strategy.

This is something that certainly needs quite a bit of preparation in advance and is something we definitely could have done better: Have a good press release prepared and a well chosen list of people ready that potentially could write about you. If possible send product samples to those people beforehand.

10. Think about (but not necessarily do) online advertisement.

We didn’t do it, but could have done it and certainly would have gotten a bigger funding. Have a strategy and decide whether it’s helpful and possible due to production, pricing and production cost.


Well, this is it for now. There are certainly more things that are important to consider when thinking about doing a crowdfunding campaign. These, however, are some things that we learned along the journey and are telling most of the people who ask us about our campaign. We hope this gives you a little insight and helps somebody. We’ll continue with this series another time and will then talk about what it’s like to build hardware and what challenges can occur along the way – and how to overcome them.

Make sure you follow us on Facebook, Twitter and Instagram to get exciting news on Foolography, photography, videography and other interesting topics. Scroll down to subscribe to our quarterly newsletter to stay up-to-date and become part of the Fools. ;-)